Home Distillation of Alcohol (Homemade Alcohol to Drink)
Reflux Still Design
| Summary
|
To increase the purity of the alcohol, and hence reduce the amount of
"off-flavours" in it, you need to use a taller column, packed with something
which has a large surface area (scrubbers are best), and have some of the vapour condensing
and being returned back down over the packing as a liquid (reflux).
For a certain height of packing (called the HETP), the purity will
improve - roughly 1x = approx 85% purity, 3x = 90%, 5x = 93%, and 7-9xfor 95%+.
Just make it as high as what you want pure. For scrubbers the HETP is about
10cm (4 inches), whereas it is 24-38 cm (10-16 inches) for raschig rings or marbles.
|
See my Detail of the Equations used
if you want to get into the detail of this.
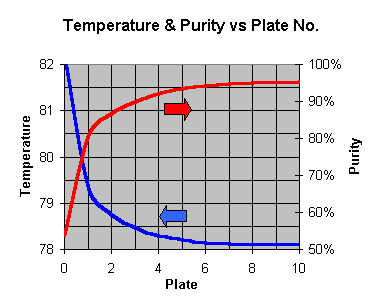
Purity is improved during distillation by allowing the rising vapour
to mingle with some liquid at a slightly cooler temperature. In doing
so, some of the water rich vapour will condense, supplying
a bit of energy to allow some alcohol rich vapour to form from the liquid
, and join the existing vapour. Each time this "mingling" is sufficient
to reach equilibrium, the purity takes a "step" on the graph
below:
Thanks to Chris Noonan for helping do this Applet.
This graph is of the "ethanol-water equilibrium"
eg a liquid of 15% alcohol will be in equilibrium with a vapour
at 65% alcohol. If this 65% vapour is then cooled to form a liquid
(it will remain at 65%), the new liquid would then be at equilibrium with a 84%
vapour, and so on. If you have a pot still, just set the plates to one.
You can see that due to the shape of the curve, most of the gains
are early on; to get to the really high % purity, you need to take lots
of steps later on. There is no way around this. If you want high purity,
you have to work hard for it. Also note (particularly for inefficient columns
with the equivalent of only 1-2 plates) that the starting % can also affect the
final % achieved - hence a good idea to use the better yeasts.
Each of these "steps" represents an "ideal plate"
where enough mingling of liquid & vapour allows them to come to
equilibrium. If you don’t allow enough mingling (equilibrium), then you
won’t achieve a full step, but end up a little shy of the target.
You get the first step free - its the boiler/pot.
Basically, off a 10% wash
1 = 53%
2 = 80%
3 = 87%
4 = 90%
5 = 92%
6 = 92.6%
7 = 93.3%
8 = 93.8%
9 = 94.2%
10 = 94.4%
One way of doing these steps is to do many single distillations,
collect the vapour that comes off, condense it, clean out the still, and
run it through the still again. This why pot stillers do double &
triple distillations to get into the 80+ % range. But a Reflux column
allows this to happen continuously; if given enough surface area to
equilibrate on, the vapour can have gone through multiple distillations
by the time it gets to the top of the column.
For each plate to work, it has to be at a particular temperature,
slightly cooler than the one below, and warmer than the one above. Only
then will it achieve its equilibrium and an increase in the alcohol purity.
The differences are really fine too – its all happening only between 78.1 C
and 82.2 C – quite a tight band to walk between.
Mike Nixon explains in a bit more detail ...
The process of separation depends on two facts:
1) when a vapor condenses then the resulting liquid has the same composition
as the vapor, and the temperature at which this occurs is the same as the
boiling point of that mixture. The boiling point lowers as the proportion
of volatiles increases, so the temperature as you go up a column naturally
decreases. One sticking point is that many think that a vapor only
condenses when it encounters a surface that is cooler than the boiling
point, but this is not so. Condensation occurs when there is a path for the
latent heat of vaporization/condensation to be removed from the vapor, and
the resulting liquid will remain at its boiling point if no further heat is
removed.
2) when this liquid re-evaporates then the resulting vapor is richer in the
most volatile components.
The packing is there simply to hold intermediate distillate in place so it
can be bathed in hot, rising vapor and allow this second process to occur.
As volatiles are further extracted from the intermediate distillate, the
boiling point of what remains increases and the depleted liquid builds up,
eventually dripping down the packing to a hotter level where it can again be
stripped of more volatiles.
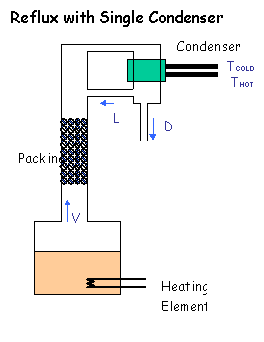
A cooling tube placed near the bottom of a column simply interrupts this
natural progression and serves no useful purpose in the separation process.
In contrast, the top cooling tube IS useful as it helps to return some of
the vapor arriving at the top of the column to the packing, where it has a
further chance of being stripped more thoroughly. This is what a condenser
placed on top of a compound column does, but with more efficiency.
This is where the various designs that have cooling tubes running through
their columns at all different heights (eg Labmaster) come adrift – they don’t
allow the required sequence of temperatures to develop fully, and thus won’t
work at their full potential. They also don’t allow all the refluxed liquid
to do its job over the packing – the less liquid/vapour contact the poorer the
"polishing" of the vapour will be.
This is why you should also (see my interactive
Heat & Mass Balance page to play with these and see it for yourself):
- Insulate the column well (don’t want breezes causing additional
cooling out of sequence),
- Let the column run at total reflux for a while (to allow the packings
to heat up to their equilibrium temperature). This is also important
so that the methanol is given a chance to all work its way to the top of
the column, so that it will all come off in the first off-take,
- Only have condensors for reflux above the packing, and
- Use a stable/continuous heat source (you don’t want it switching off
& on all the time causing surges of vapour going up the column
then periods of nothing; it has to be a steady continuous flow of vapour & liquid)
So you can easily work out what is required to get a particular %
purity; just look up the number of ideal plates needed, eg 2 plates = 87%,
3=90%, 4=92% and so on. Remember you get the first one free - its the pot.
A pot still is the equivalent of a single plate; if it has "thumpers"
attached to it, each of these can act as an extra plate.
Why call them plates ? In large distillation columns, they are exactly
that; large metal plates or trays, which the liquid flows over, and the gas
bubbles up through holes in them. However they are quite tricky to design
& build, and not really suited for small column diameters (say less
than 1 ft diameter) - they’re just too fiddly. Below this size, its easier
to use a Packed Column; where the packing can be random (eg just dumped in
there and given a shake), or carefully positioned & stacked . For any
particular type of packing, we can estimate how much of it is required to
make one of these "ideal plates". See
http://www.5continentsusa.com/cer-pack.htm for examples of different commercially available
types of packing. These commercial packings are quite difficult to source, then
expensive to purchase. They're designed for an industrial operation, where they're
expected to be run continuously 24/7 for weeks or months at a time without fouling up.
For a hobby distiller it is far easier, and with higher performance (%purity), to
use common pot scourers (non-rusting stainless steel or copper) instead for packing, as
we'll be cleaning them frequently (like after every 20L run).
Jim adds:
While gathering materials for my (first) reflux
still, I came across an interesting material used for making batteries. It's a
fine-mesh expanded metal made from copper by the Exmet Corporation. They
make expanded metal from a variety of metals besides copper in sheets varying in
width from .099 in. to 60 in.
Their spec sheet is found
at: http://www.exmet-corp.com/chart.html
I don't know how you would calculate the void to surface ratio to get
optimum results. I leave that to the "experts".One could roll a 30" wide
sheet, for example, into a single piece that could be inserted into the column.
It would have a very consistent internal structure. It would be easy to remove
and clean.
Phil suggests a cheap supply of ceramic packings though ...
Have you checked the aquarium shops for ceramic rings used for pre filtration. I recently bought 2 litres for change from Ł10 (Ł4.85/l). I suspect they would do the same job. They also come in hex or tube shapes. There are also similar rings for bio filtration that have an open surface area so would perhaps be more efficient, though could be a bugger to clean
More about using plates (rather than packed columns ...
Ken : The idea with a fractionating column is a temperature gradient (falling of course) as you go UP the column, but a constant
temperature ACROSS the column at any height. As the diameter of the column increases, it gets harder to achieve the constant
temperature at a given height if you continue to use a packing material -- hence the plates. Plates give you resistance to
flow in an upwards direction, but very easy "spreading" horizontally.
George : From what I have read, a general rule of thumb is; up to 4" you
would be better off with scrubbers, anything bigger than 4" and scrubber
will tend to channel, from 4" up to 8" you would do well with packing like
pall rings and the like, from 10" and up you would do well to use
plates. However I have seen plans for a 4" still with bubble cap
plates and they claim to be the most efficient still made. Their claim not
mine. To make the 10" bubble cap plate type still work you would
need somewhere around a 10 hp boiler or around 350,000 btu input. It
would also produce up to or around 30 gallon of ethanol per hou using a 10%
wash. I have gleaned this information from a lot of different sources
and complyed it myself, none of it is to be considered absolute.
Their has been some writings about using some sort of perforated plate with
the packing on the 6 to 8 inch stills to help even out the vapor flow.
On spacing I read once, and do not remember where that the spacing
should be double the diameter as a rule of thumb. But the heat input,
the quanity output, and the wash percent all effect this so it is
hard to say. Their is no set rule to follow. Perforated plates require a
lot of drilling and the bubble caps are hard to construct. Anything over
a 6 to 8 inch would require quite the effort to bring up to speed.
Unless you have a cheap source of heat, a motor of some type that runs
constancely , the expense of bringing one of the bigger one up to
steam would be very high.
One other thing that effects the plate type stills is wheather or not
you are going to filter out the solids in your wash. If you are not
then your plates would have to be designed to be self cleaning. If
you do then the solids need to be compressed to get as much alcohol
recovered as possible.
Gaw : Using the photos ... of a bubble type plate still in
Holland I built a four inch eight plate still which seems to work
quite well on top of a six gallon electric water heater with benefit
of a thermostat which I added.
To further the experiment of continuous distilling I added a thirty
gallon pot with a connection three plates above the smaller unit and
after the complete system reaches operating temps the unit seems to
function quite well at 94-95 per cent.
I used ss plates which I found in a salvage yard and soldered the
bubblers into separate units which I then bolted together, believe it
or not, with ss bolts and neoprene gaskets on each end of the four
inch pieces.
Hennie writes:I think the best solution for an ethanol distillation would be a packing of copper rings. These should not be too difficult to manufacture.
Winding a copperwire on a thin rod with an electric drill and cutting the created spring to rings shouldn't be too difficult.
The height of packing needed in order to do the same job as an ideal
plate is called the HETP -
Height Equivalent
to a Theoretical Plate. Smaller HETP’s are better than large ones,
as it means that for a given column height (say 1m) you end up with more
ideal plates, eg only 2 plates (87% purity) if the HETP= 0.5m, but 4 plates
(92% purity) if HETP = 0.25 m. If you don’t have an exact number of
plates, that’s still OK; you’ll end up somewhere proportionally between
the two.
So an empty column, with no packing, ain’t going to do a lot.
Sure, you might get a little liquid running down the sides of it, but this
has got nowhere near the same surface area as using packing.
The HETP for a packing depends on its:
- Size (smaller objects pack together better). The size also needs to be in proportion to the column diameter too
- Voidage (need to allow room for the gas & liquid to flow around them, don’t want to block the column off)
- Surface area (eg how many square meters of surface you have per cubic meter of packing – the more surface area, the more places for the liquid & vapour to mingle)
- The amount of liquid & vapour flowing around it
Typical HETPs for common packings are :
| Packing | HETP |
| Stainless Steel Wool Scrubbers | 0.13 m |
| Marbles (10mm diameter) | 0.33 m |
| 6mm Ceramic Raschig Rings | 0.24 m |
| 13mm Ceramic Raschig Rings | 0.38 m |
Zoran suggests that in some cases marbles may be as effective as a 0.2m HETP.
These HETPs change depending on how much liquid & vapour are
flowing around them. This ratio can be described by the Reflux Ratio -
the ratio of Liquid flowing down the column over the amount of distillate
drawn off :
R = L / D = (V-D) / D
This can be easily measured if
the still design is like Stone & Nixon’s where all the vapour is
condensed separately, and you control the amount withdrawn vs returned
(refluxed). It’s a little harder with the Stillmaker design where the
refluxing liquid is determined by the amount of cooling done by the first
condensers, and you never get to single it out, but you should be able to
estimate the amount of vapour from the amount of heat you apply.
As the reflux ratio increases, so the HETP improves. Generally though,
you can see that choosing the right packing to start with does the greatest
improvement; increasing the Reflux ratio only squeezes the last extra bit
out of it (at the cost of having to wait longer too). Where you will notice
it is when the design is poor to start with - increasing the reflux ratio
will help out quite a bit.
Calculate the HETP for your still ...
See http://www.raschig-rings.com for more information on other column packing details. Note also that when real plates are used
in a column, you also need to do a similar calculation - they are often far from ideal in
operation, and you may need several to achieve one HETP.
Jan Willem of http://www.geocities.com/homedistilling/
experimented with this ...
I get 94% at a rate of ~ 500mL/hour. My column is 115cm long and 42mm wide
Filled with potscrubbers from the undersite to just under the
precooling coil. (Tony - ie its of a good design already - heaps of HETP)
At my latest distilling escapade I turned the reflux ratio up.
Just as a test that would show me how pure it could get AND if there
was a taste diffirence (after dilluting ofcourse)
Collected the good stuff at 100mL/hour (a long wait)
Then the score was initialy 95.?% and was going down a bit to 94.5%
(Dunno if it was 94.3 or 94.8 so I say 94.5%)
After the taste test I noticed NO difference, but I'm no expert at
wodka tasting.
The improvement isn’t linear either - you can halve the HETP for
Stainless Steel Wool (SS below) by going from "bugger-all" reflux
to "some" reflux, but there is little improvement winding it up
too far past there.
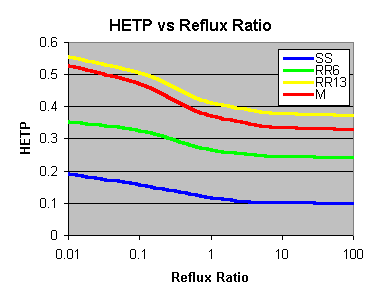
SS = Stainless Steel Wool Scrubbers, RR6 = 6mm Ceramic Raschig Rings,
RR13 = 13mm Ceramic Raschig Rings, M = 10mm Marbles
So, put these together to work out your still performance;
- Determine the HETP for the packing you are using, then
- Work out for the height of packing you have, how many Ideal
Plates you have, then
- Look up the purity expected for that number of plates.
SS = Stainless Steel Wool Scrubbers, RR6 = 6mm Ceramic Raschig Rings,
RR13 = 13mm Ceramic Raschig Rings, M = 10mm Marbles
But what diameter should the column be ? This needs to be worked out
from the amount of heat you are putting in. The more heat, the more vapour
you generate. If the vapour rate is too great, then instead of having
your refluxing liquid flowing down the column, it will be blown out the
top. You also need to consider how much space the packing is taking up
too. The following diagram is based on the calculations - unfortunately
the sizes are about 50% smaller than what appears the actual limit, so
scale up the calculated result if you plan on following them.
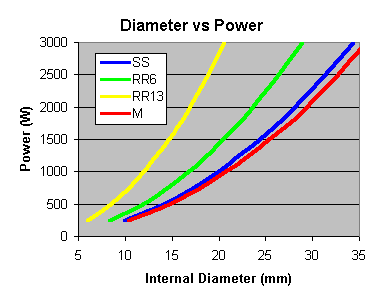
SS = Stainless Steel Wool Scrubbers, RR6 = 6mm Ceramic Raschig Rings,
RR13 = 13mm Ceramic Raschig Rings, M = 10mm Marbles
Instead, I scale up/down for what I know works for me ... using scrubbers for packing,
a 1.5" diameter column can handle 1800W. So .. for constant vapour rate per cross-sectional area ...
Maximum Power for a Given Column Diameter
1.00" = 800 W
1.25" = 1250 W
1.50" = 1800 W
1.75" = 2450 W
2.00" = 3200 W
2.25" = 4050 W
2.50" = 5000 W
Note that these figures are roughly the maximum power that you would want to use for any
given column diameter. Mike argues that you should use quite a lot less power ...
All these figures above equate to a vapor speed up the column of 119 cm/sec (47"/sec)
Assuming for ease a column length of 119cm, that means that vapor will traverse the column in one second, and during that time it is busy condensing and being reboiled many times.
Tony reported that a 25mm diameter column at 1350W gave very poor results, but a 36mm diameter column handled that power well.
Vapor speed through the 25mm column would have been 211 cm/sec, so it's not surprising that it didn't work well as the vapor had only 0.56 seconds to traverse the column. Increasing the column diameter to 36mm brought the speed down to 101 cm/sec, so the transit time increased to 1.2 seconds. This is on the 'safe side' of the recommended figures in the table.
I personally favor lower power settings, and the reason lies in measurements I did with column stability, measuring the temperature gradient at steady state for different power settings, and first using a simple reflux column that relied solely in internal condensation for reflux. (A not-to-scale schematic has been posted in the Photos section of Distillers. It's called 'Temperature gradients')
I used a 2" diameter column and found that at 750W the temperature gradient settled out 2/3 of the way up the column, at around 80cm. This told me that vapor moving at 28 cm/sec had fully separated after spending 2.5 seconds in the packing. Increasing the heat input raised the point at which the straight line met the curve, but when the curve reached the top of the packing, the curve switched to the straight line sharply, not asymptotically, and the temp in the top rose to match the increasing temp at the top of the packing. So using 1350W with a 25mm column would result in full separation occurring at a point right at the top of the column, with little or no leeway.
Adding imposed reflux with a compound column did little to change the temperature gradient up the column, but what it did do was add that touch more separation in the region above the top of the packing. I could detect no change in the 'asymptotic' nature of the temp gradient when the straight section still lay inside the packing, but when power was increased to raise that point to the tip of the packing then the more I increased the power a sharp 'step' began to appear. The straight line went down to the top of the packing, then quickly jumped to meet the temp in the top section of packing. This indicated to me that the composition of the cycled vapour in the void between the top of the packing and the top condenser was the result of further separation imposed by the imposed reflux operation in that region. In effect, I had two stills one on top of the other, the bottom being a simple reflux still relying on internal reflux, and a recycling still that took what the reflux still gave it and used that as its starting point. This held true until either the power was increased to a point when the curve would have settled down itself in a longer column (about a quarter extra length) or the take-off ratio was increased to a stage when the sharp step suddenly broke down and the old asymptotic curve re-asserted itself, and quality instantly dropped.
OK ... so what has all this got to do with those figures in the table?
Essentially, it is that the figures in the table are good for indicating the maximum you can push a simple reflux column to and attain full separation ... just!
If consistent results are wanted, then the aim should surely be to allow some leeway and try to get that curve settling down before the top of the packing is reached. That way, the reflux column has a chance to do its job as fully as it can before either taking off product, as in a simple reflux still, or passing on the results to a secondary top section that operates with imposed reflux for that final touch of separation. My personal 'cautious old fuddy-duddy' approach would be to reduce all those wattage figures in the table to 1/4 of what they are now and regard that as a good guide for reliable operation. This sounds drastic but, when you think about it, gives much greater assurance of high quality with simple reflux stills, and greater flexibility in take-off rates with a compound still. Maybe I'm just an aging Sunday Driver, but I find that I get to where I'm going with less hassle than a Boy Racer, and both my passengers and booze samplers enjoy the ride better!
Generally, a 2" (50mm) diameter is an ideal size to use. This will happily run from
750W up to 2500W without any trouble. If in doubt, go for 2".
Its this amount of energy that you put in which will determine the
rate at which you make and collect the distillate. If collected at the
condenser at say 95%, it works out roughly to the following figures. If you
run a reflux ratio of 4 (e.g. return 40 mL for every 10 mL you keep -
typical for SS scrubbers) - then the second figure is the flowrate you'd
expect to collect at ...
1000 W = 52 mL/min (max, no reflux) or 10 mL/min (if RR=4)
1500 W = 78 mL/min (max, no reflux) or 16 mL/min (if RR=4)
2000 W = 105 mL/min (max, no reflux) or 21 mL/min (if RR=4)
2500 W = 131 mL/min (max, no reflux) or 26 mL/min (if RR=4)
3000 W = 157 mL/min (max, no reflux) or 32 mL/min (if RR=4)
3500 W = 183 mL/min (max, no reflux) or 36 mL/min (if RR=4)
4000 W = 209 mL/min (max, no reflux) or 42 mL/min (if RR=4)
Note though that you are probably going to be limited in how much
power you can deliver to the still. Many homes only run 10 amp fuses in their
fuseboxes. This will limit you to 240 V x 10 A = 2400 W before you have
to have a safety chat with your electrician about upgrading the wiring.
The risk of making the column diameter too small is that the column
will "flood", as discussed in "Chemical Engineering - June 2002" pp 60-67 by Simon Xu and Lowell Pless about flooding in distillation columns. These guys have been using "gamma scanning" to work out where abouts various distillation columns are flooding, and why. I'll quote a few paragraphs about "packed columns" for ya (they also did a fair bit on trayed columns) ....
For a given packed column, at the high end of liquid and vapour rates we encounter flooding as liquid backs up the column and fills all the void space in the packing bed. Poor disengagement between vapour and liquid (back mixing) reduces the separation efficiency, and the high liquid hold-up in the bed increases the pressure drop.
The traditional approach to analysing flooding in packed columns relies on measuring pressure drop. At low liquid rates, the open area of the packing is practically the same as for dry packing. In this regime the pressure drop is proportional to the square of the vapour flowrate. As the vapour rate continues to increase, eventually a point is reached when the vapour begins to interfere with the downward liquid flow, holding up liquid in the packing. The increase in the pressure drop is proportional to a power greater than 2.
At this point, the pressure drop starts to increase rapidly because the accumulation of liquid in the packing reduces the void area available for the vapour flow. This area is called the "loading region". As the liquid accumulation increases, a condition is reached where the liquid phase becomes continuous .....
The problem with this traditional approach is the difficulty in differentiating between the transition points of the loading or flooding in the pressure drop curve. Some suggestions for the definition of when a packed column become fully "flooded" are :
* the slope of the pressure drop curve goes to infinity
* the gas velocity is so great that efficiency goes to zero
* pressure drop reaches 2 in.H2O per foot of packing
* pressure drop rapidly increases in a region, with simultaneous loss of mass-transfer efficiency ......
There are two forms of liquid hold-up in packed columns. One is referred to as static hold-up. Static hold-up is the amount of liquid that is held onto the packing after it has been wetted, then drained - the film of liquid or droplets of liquid that adhere to the packing. This amount jointly depends upon the physical properties of the liquid and the type and material of the packing.
The second aspect is the operating or dynamic hold-up. Dynamic hold-up is the amount of liquid held in the packing by the interaction of the vapour and liquid flows. Dynamic hold-up must be measured experimentally. To measure this amount, instantaneously stop the liquid and vapour flows, then collect and measure the volume of liquid that drains from the packing. The total liquid hold-up in packing is the sum of these two forms of hold-up.....since the static hold-up is constant, the operating or dynamic hold-up changes in proportion to changes in liquid and vapour rates. The void fractions in a packed bed may change across the bed due to fouling or damage, and vapour-liquid loads may be different along the bed for different operating conditions. The peak loading could occur anywhere in a packed bed, or a liquid distributor could initiate the flooding......
An interesting phenomenon for random packing and most corrugated sheet packing is that the separation efficiency of an "initial flooding" bed could be better than a "normal" bed, because of high liquid hold-up and intimate vapour-liquid contact in the "frothing" regime..... But at the high-efficiency state it is difficult to keep the column stable, and the column could go out of control as a result of any slight process turbulence. For this reason it is always recommended to avoid designing a packed column close to the initial flooding point. In operation we would not then be overly concerned with some liquid accumulation or hold-up, as long as the column could be kept stable and under control......
Stainless Steel Wool Scrubbers/Scourers
From the above analysis, I figure that Stainless Steel Wool Scrubbers (pot scourers)
are 2-3 times better than rachig rings with the typical small diameter columns we
use in this hobby.
Using these as the best type of packing will allow you to use a smaller column or a lower
reflux ratio to get the same purity. Or keep the same height & reflux
ratio, and have improved purity. Are you happy with the existing purity, or
do you want cleaner alcohol ?
The stainless steel scrubbers are probably only good however up to about 2-3 inch
diameter columns. Beyond this, they will be difficult to keep in place &
have even liquid flow over them (e.g. don't want areas where they are really
packed tight or spread too thin - it has to be uniform). It is at the
larger diameters that the more regular packings like rachig rings come into
their own (as they won't compact up or seperate to leave holes),
and for even larger diameters, that you'd consider structured
packings (i.e. carefully stacked into a regular pattern). One rule of thumb
I've heard of for raching rings is to size them 1/10th the diameter of the
column; e.g. the small 6mm rachig rings are really only suitable down to
about 60mm (2.4") diameter columns (and they're expensive!).
So for columns up to 2-3 inches in diameter (50-75mm), you might as well
go for the better performing, cheaper option of scrubbers. Bigger than this though,
and you might need to start using what commercial units do.
David comments ...
I use 3M ones
myself as I have found them the best quality. Use a good quality one
preferably. On a 1.5 or 2" column each should fill 55mm to 75mm (max) of
column (less on 2"). Even less if you prefer. I tend to work in the vicinity
of each filling somewhere between 55 and 63mm. At 55mm on a 36" column this
equates to almost 17 from which I deduct 1 to allow for space at the top ie.
=16. Allow at least 2" to 2.5" of clear space between the top of the
scrubbers and the takeoff point for the vapour to expand into and so the
reflux falls back into the scrubbers.
Do not unravel but tease them out by hand a bit so they fill the whole
column diameter rather than just a part of it. Most of the ones I have seen
in NZ do not have rubber bands around them. Place them into the column from
the bottom one at a time using some sort of restriction at the top and
bottom to prevent them going further or dropping out back into the boiler..
I use a 2" pall ring which works well.
On a slightly longer column (1m = 39.37" ) I use 19 off memory so 17 is
probably around the right number. You dont want them too loose or too tight.
If too tight they will compact more. The main thing is to have an even
constant heat so you dont get surging. Surging causes compaction.
Calculations
I've developed a couple of interactive pages which do all these
calculations for you :
Designing Your Own Still
So how do you put all this together to make your own still ?
Say you're looking at wanting to make 90%+ purity, off a 20L wash.
Pot
To hold 20L you want at least another 1/4 spare for foam, etc.
So go for something in the 25-30L range. I'd suggest something
where you can easily lock the lid down, but also be able to get
into it fully to clean it out. Suggestions include paint tins as
seen in walt or
AV25L or a preserving pan
with a clipped lid like Teds at http://mwci.s5.com/.
These all have pretty thin lids, so to support the column,
you may need a small flange to help hold it all up, or a stiffening
plate/oversized washer to help strengthen the lid.
Heating Element
Probably in the 1000-1500 W size. Whats cost-effective for you ?
A 1500W element will heat up the contents to begin in around 65
minutes, but a 1000W will take 98 minutes. If time is crucial, you
could add a second element to act as a boost during the initial heat up.
Column Sizing
The diameter is based on the amount of heat you're using, whereas
its length determines what purity you'll get. Its a hobby
still, so I've assumed that the packing will be stainless steel or
copper scourers - they only take about 1/2 the height that marbles do
to get the same purity. You will also need to insulate the whole
length of column too - plumbing suppliers sell slip-on piping
insulation for around NZ$8/m
Diameter : 1 inch is too narrow for a 1380W element, but
1.5 inch is OK with a 1800W element. Roughly, lets say to use
1.5 inch for 1000W - 1500W and 1.75 - 2 inch for 1500W - 2000W.
If in doubt, go up in size by say 0.25 inch. Too narrow will lead
to all manner of problems & difficult operation, but too wide will
only give a minimal reduction in purity. 2" is a well used, very reliable
diameter that works under most circumstances.
Height : This is the purity. Use the wee interactive
applet at the start of this page
to see how the number of stages or HETP's improves the purity.
Its easy to get the first gains up to 90%, but then more difficult
to squeeze out the last improvements towards 95%+ Lets assume
(we'll come back to this) that each HETP for scrubbing pads is around
15cm... then for a 15% wash,
No packing, purity = 62% , 15cm packing = 82%, 30cm = 88%, 45cm =
90%, 60cm = 92%, 75cm = 92.8%, 90cm = 93.4%, 105cm = 93.9%.
These won't be exact, and depend on a number of different factors,
but it shouldn't be too far off. So, if height is a problem, and
you're happy with low 90's, then 60cm should do ya. If you want
to make a perfect vodka, go for 120 to 150cm. Normally I'd recommend at
least 100cm, but the choice is yours, as it depends on the type
of product you want to make.
These numbers assume that we've reached equilbrium nicely for
each 15cm of packing. To do so, we need to provide heaps of surface
area for the liquid and vapour to mingle over (done - using scrubbers),
and that we're refluxing a large proportion of the vapour back down
as liquid, rather than keeping it. But this means that our take-off
will be rather slow. Eg we may be able to start out with a reflux
ratio of say 3-4 (ie return 30-40mL for every 10 mL we keep) when the
pot is very rich in alcohol, but later on, when its getting down in
alcohol, we may need to increase this up to 5-10 to keep the high purity.
A reflux ratio of 4, with a 1500W element means that we're collecting
at around 20 mL/min. Thus a 20L 15% wash will take a minimum of 2.5 hours to
collect (20 mL/min), up to 5 hours at a reflux ratio of 8 (10 mL/min). The
actual time will be somewhere between these, depending on what ratio you end up
needing in order to deliver the purity you're after.
If the distilling time is taking too long, we can make the column taller,
and then run at a slightly smaller reflux ratio, to get the same purity.
The collection rate is directly proportional to the element size, so if a
1500W element with reflux ratio of 4 takes 3 hours to distill, then 1000W will
take 4.5 hours, or a 2000W 2.25 hours.
Making the Reflux
Theres a couple of different options for how to provide the refluxing liquid.
The choices come down to how much control you want over it.
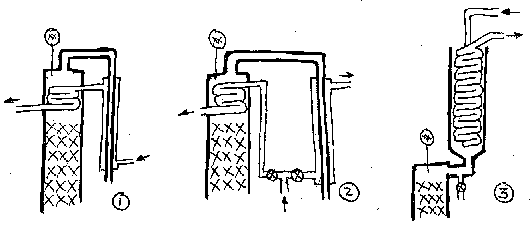
The first, simplest and cheapest, is just to have a cooling coil in the head
of the column, which is fed cooling water direct from the condensor. Provided
you have sufficient coil surface area available (eg > 1-2 m), you should be able to increase
and control the reflux ratio to give you the high purity. If you only have a couple
of coils inside the column (like I've drawn), then you wan't be able to make enough reflux, and
you're in for mediocre results.
Second - plumb the cooling coil with its own water supply - say a T joint
off the main line, with a couple of valves to be able to regulate the water to
the coil seperately from the main condensor. This would allow you to say turn off the coil if you want
to do a stripping run, without affecting the performance of the main condensor.
For excellent instruction on fitting a coil, see Homers diagram or a couple of Phils
photos.
If the main column is too narrow to have a coiling coil inside it, you can
always use a cold collar around the outside of it. Another, but less effective
method is to coil around the outside of the column.
There are excellent instructions for making the external condensor in the
"StillMaker" pdf, or at Http://www.Moonshine-Still.com.
Basically just use a couple of T fittings, or if you're a dab hand at welding, just
build it up yourself. Another (easier) option is the "Euro" still condensor, where
the cooling water is simply fed in a tube up through the outlet pipe.
See a photo of it.
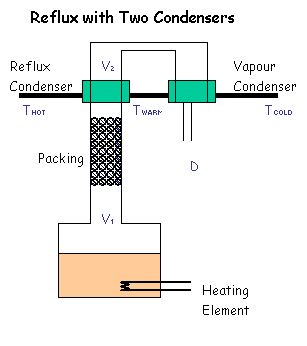
Third (my preferred option) is to do the Nixon style of condensor, as seen in the
photos, where all the vapour is condensed (with an oversized
coil - thus minimal water required), and then you proportion off the amount of
liquid you keep vs return. This gives you maximum control over the reflux ratio,
being able to dial it up from "total reflux", essential for getting a column into
equilbrium before taking off the heads, through to "no reflux" if you want to do
a stripping run, or only a low reflux run say for a flavourful rum or the like.
The disadvantage of this design is that it adds to the height - say another
30 cm. But I reckon well worth it.
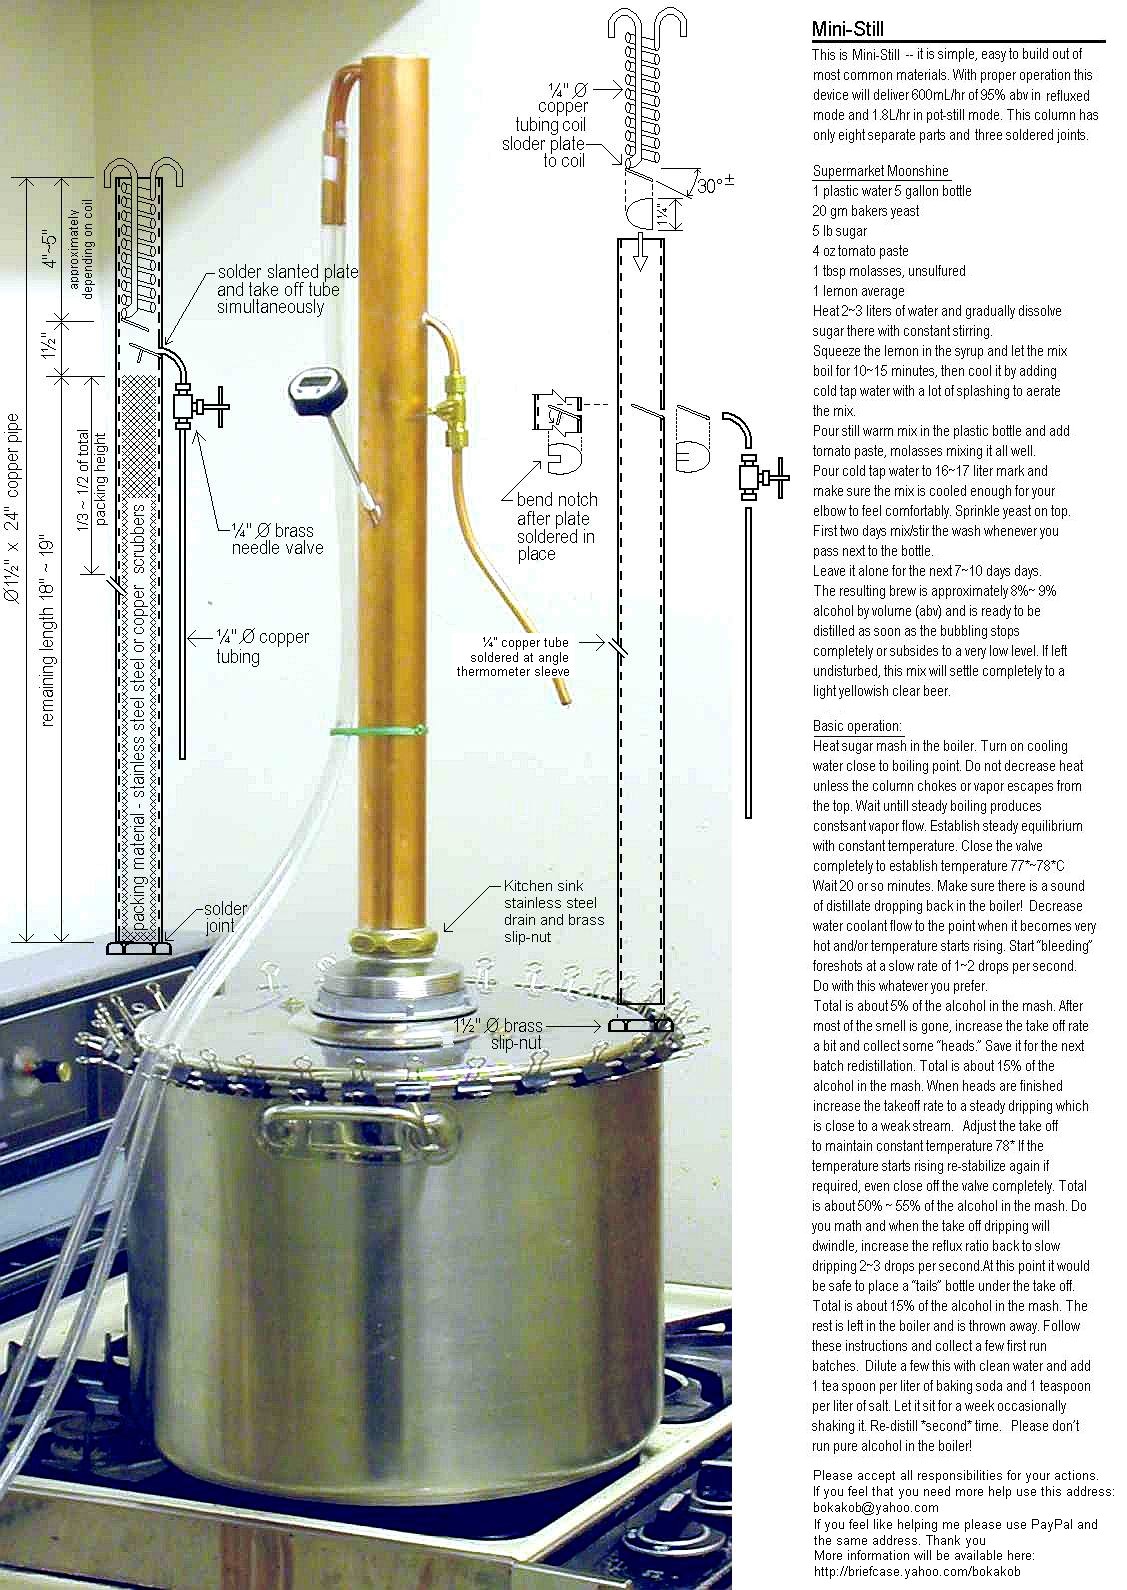
An excellent variation on that is Alex's (Bokakob) mini-still:
Controls
I prefer to only control the reflux ratio. If the column is wide enough, then you
don't need to worry about metering the heat input via the element. Either up the
water flowrate, or close down the take-off valve, in response to the vapour
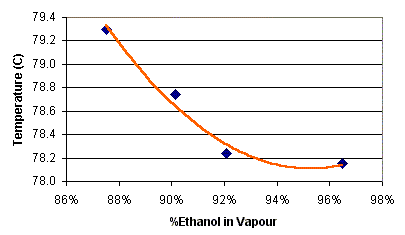
temperature measured at the top of the column. Use this graph below
to compare temperature to purity. Cheap (NZ$28 at www.dse.co.nz ) digital thermometers are
excellent for reading this temperature.
Summary
So, in summary, to make a very cheap, short still, how about a 1500W element, with a 1.5 inch
by 60-70cm column, scrubber packing, and simple external condensor (Euro style) & internal
cooling coil of say 4-5 turns, directly plumbed between the two.
To make a more high performance still with more options on how to run it & what products
you can make from it, first make it taller, and then consider using the Nixon condensor.