Photos of Reflux Stills
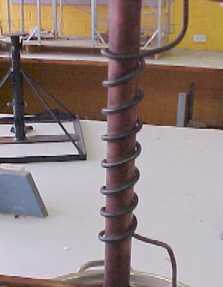
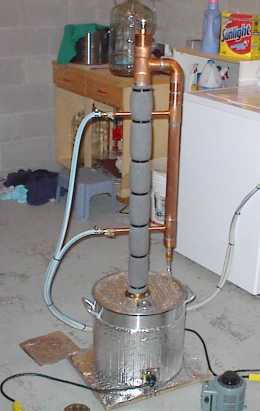
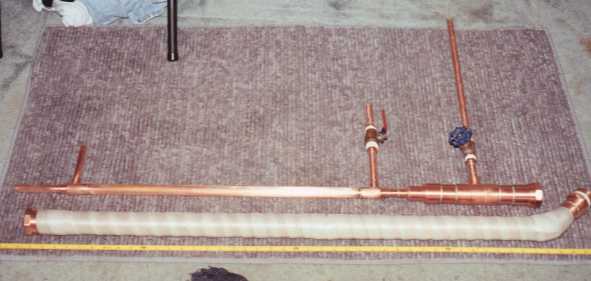
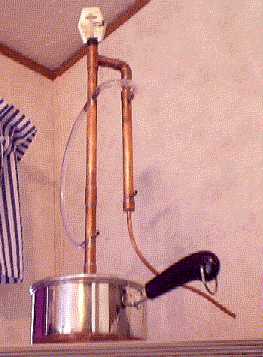
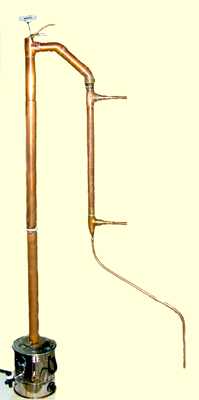
Theres quite a variety of general reflux stills about.| Marty's Still | ||||
| ||||
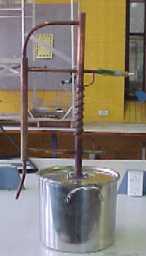
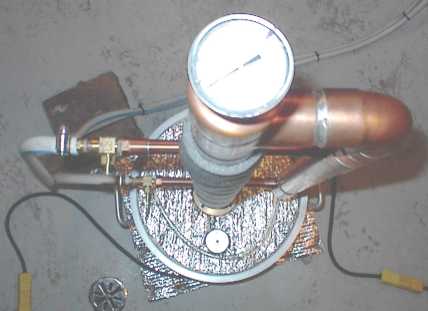
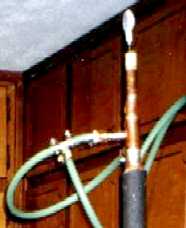
| Peter's Still with Vodka Bottle Condenser | ||||
|
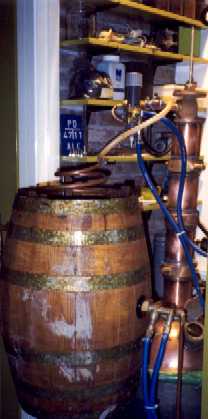
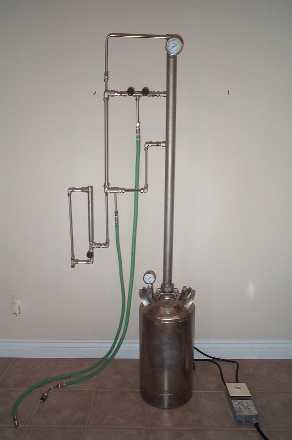
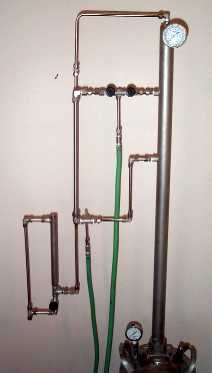
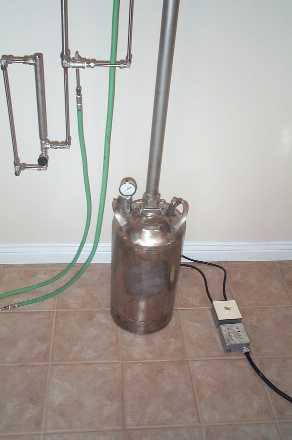
It is set up in "ambient reflux" mode in
the first picture. The column is 1.7m. It can be turned into a vapour management still by putting my vodka bottle on top, and a gate valve in the horizontal outlet. The keg was very roughly angle grinded. it has a series of M6 studs welded onto the top, a flange fits over these and is held on with nuts. I cut the bottom off the smirnoff bottle by wrapping some masking tape around it near the bottom. Then I used a normal steel file to score a line around the bottom using the masking tape as a guide. You have to go slow at first since the file tends to slip. Once you have filed a small bit you dont have to be so careful as the file slips into the groove easily. Then i heated the bottle by sitting it directly on my cooker hot ring for a few minutes and then quenching it in cold water. Those vodka bottles are very tough and it took a few quenchs before the base fell off. I have used a glass cutter too, but find the file easier. On the forums somebody mentioned using a vibrating metal engraver. nearly everybody will have a file though. I have cut wine bottles without scoring the bottle at all, just heating and quenching, about 1 in 4 bottles cracks correctly. The broken bottle should be sanded/filed down to prevent cuts. it is great to be able to see the reflux in action. That photo is of it actually running but i think the camera shutter speed was to slow to capture what was going on. the column is s/s at the 2 ends and has a copper centre piece about 1.4m which the s/s tubes slot into to make a perfect fit. It has 20 s/s scrubbers. It is insulated with a large cardboard carpet roll which is stuffed tight with glass fibre attic insulation inbetween the gap of the cardboard and the column. What you cant see in the photo is the plumbline i have on the column, i put cardboard under the sides of the keg until the column is perfectly vertical. |
 |
| ||
| Dom's Still | ||||
|
I have constructed my own offset head still. The unit breaks down for easy storage, cleaning and transport. I have plans for a bigger boiler as this one is less than 19L. | ||||
| ||||
| Tim J's Still | ||||
| ||||
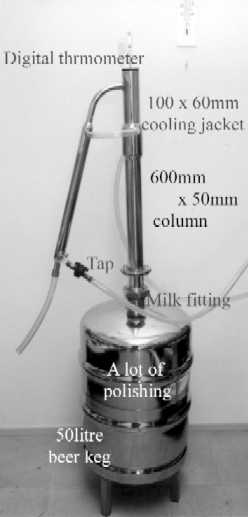
| Ken & Mikes Project | ||||
| We get 2.7L from a 23 L, 10.7% mash. It is 91% Mike : We polished with activated charcoal and used caramelized sugar for colour and oak toasted oak chips are in the diluted (52%) product for the vanillans. I insulated the boiler to make it more efficient (around the pot and a round piece on top of the pot,as per picture).I also insulated the colomn with 2 pieces of insulation that are fit for a 1" pice of copper pipe.(one piece per side...look at the picture).By the way...I use 7 brass scrubbers from Zehrs market in my column and they impart no extra flavours!!! When rolled out between the hands...the scrubbers are about 5" long and 2" in diameter. Put them into the column slowly and carefully!!! (also see Mikes recipe for Capt Morgans Spiced Rum) | |||
| Ken :
Pot Temperature: Measured on the lid for a better idea of the steam temp as
this is the portion that is most critical. By keeping the temperature
between 198-206 degrees F (92-96C), we are able to tell when the wert is getting too
hot and giving us that 'Brackish' smell that can be calmed with carbon
filtering but never quite goes away. Now, Mike and I have slightly
different opinions on the tails aspect but we do agree that the burning of
the wert is what was making the first few batches of rum a little on the
unpalatable side. We bit the bullet and drank it anyway but with the new
numbers, we have made a very flavourful rum product. Final flavouring with
cloves and cinnamon will be the defining bit. When the lid temp reaches
208F (98C), shut down the still. I know, there is more to come but I found a +4
degree variation between the lid and the boiler body. As soon as the boiler
body hits 212 (100), the wert started to burn and that... smell... came through
into the product. Variac: Because we are using 2/1500 watt heating elements from a water tank for heat up, we get to temperature on 23L in about 45 minutes. At that point, we switch to one heater only (all that is needed to maintain the temp now) on variac control at 105-107 vac. Kinda like using a stove rheostat at 9 instead of 10. This slows the heating of the pot to get a longer run and as the alcohol is boiled off, the temperature climbs. We don't do a full boil all the way through, just a slight rolling. We also found that we only needed 2 scrubbies (teased until they cried) in the column you see in our picture. We had added some more but it took quite a bit of heat to get a flow. We clean distilled water with nothing in the column and decided that less is more. To help the reflux happen quicker without losing too much in percentage, ( about 5% ) we didn't have to run quite as warm and ended up with a smoother result. We will add 1/2 of a scrubby for the next boil but we are on the right track for us. Keep in mind that these scrubbies have been pulled almost to the length of the column and allowed to coil back on themselves. This, it would seem, gives us the same area as the rashiq rings. | ||||
| http://ponu.haisee.com/ | ||||
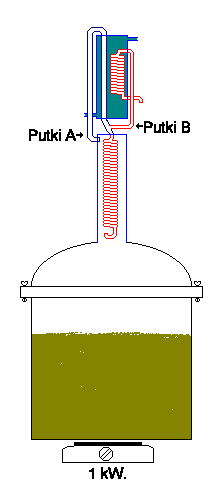
| Reima tells me ..."there is a neat still at http://ponu.haisee.com/
only it is in my old lingo so I have translated it hoping the owner
does not mind.
It should tickle the minds of those who like to play with thumpers,
cause it seems to have one built in." Lower colon is 300-400mm high. Top one is 250mm. Red tube of 8mm and blue of 10mm copper. This does a double distilling in one go, like a built in thumper, and is self tuning. Only critical tuning needed is cooling water flow. Steam goes through "A" and condenses on its way back to lower colon coil made of 8mm by about 1m length copper tube. In this coil, being in the path of about 90C vapours a new boiling of distillate occurs. At the bottom of this coil there must be a 50mm liquid lock (a bend up). The lighter ethanol in this coil boils and travels up to the T piece and to the condenser, the heavier stuff runs back to the boiler through the liquid lock. Both colons are of 60mm outside diameter SS-tube Lower colon is 350-400mm and top one is 250mm length. Coils of 8mm copper tube. Tube A 10mm and B 8 mm tube. This works on a 20 litre boiler heated with a 1 kW heater. Condenser coil length is not critical 0.5m length is enough. Highest pressure in this system is then 50mm water height. When tube A is starting to warm up it is time to let in some cooling water, only little. It should not run out as thick as a match stick, if too much cooling there will not come out anything. Try to keep the top colons lower part hand warm when its upper part is hot. And remember the slower it comes out the stronger it is. | |||
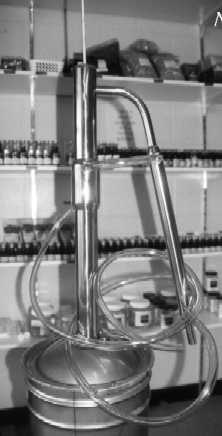
| Scott's POS Firewater Hook Column & Flamethrower Condenser email: goyeast@yahoo.com | ||||
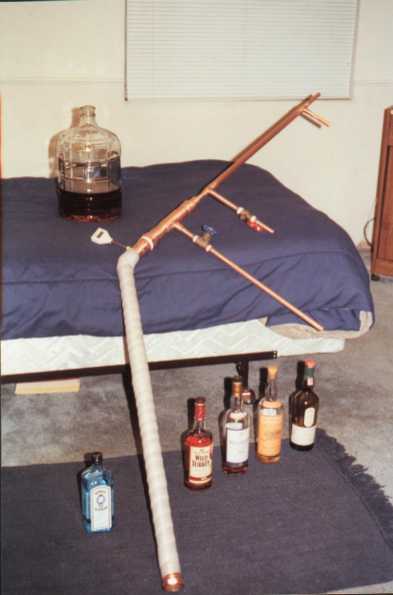
| ||||
|
This is my column and condenser, assembled
minus the tubing. It achieves total reflux by
default, and the distillate is drawn off via the gate
valve. I've since added a needle valve below the gate
valve in order to achieve finer control.
With a 750 watt element, I've drawn 400 ml per hour of
95%+ alcohol, which isn't very fast, but I just
purchased a 1500 watt element that will probably
increase this significantly. The column is 45 in. x
1.5 in. and is packed with s.s. pot scrubbers.
The condender assembly is 44 in. long, with the
jacketed portion being 26 in. x .75 in. around a .5
in. pipe (a lot longer than necessary, I've found). I've only had two issues with this design. 1) The condenser screws onto the column, thus in order to draw off alcohol, I need to wrap the column's male fitting with PTFE tape to insure that the take-off valve is pointing toward the ground. 2) When assembled, the column and condenser need to be stablized. I use a homemade wooden frame which has worked well. | ||||
| Pilch's Stills | ||||
| ||||
| Purity : 92% | ||||
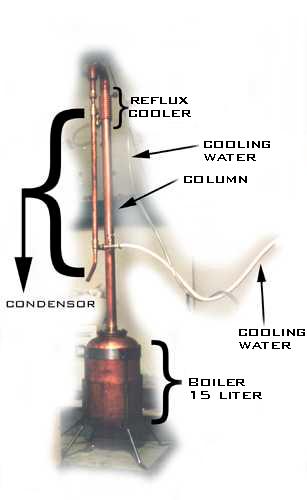
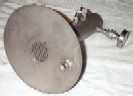
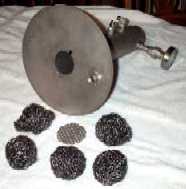
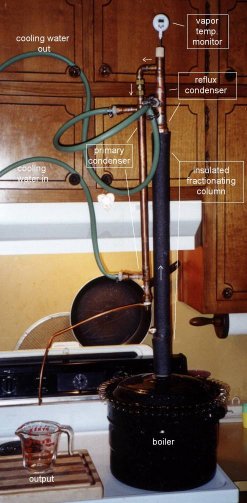
| Mikrobios' Still | ||||
| Purity 94.5-95.0% at 40 mL/min The boiler is a 30 L stainless steel vessel sold as a fermenter. It is Italian, and is imported into the UK by Brupaks Ltd. The column is 1020mm long, of 54mm copper tubing with 20 stainless scourers, insulated in use and without through-tubes. At the top of the column is a water-jacketed reflux condenser (inner 22mm, outer 28mm) 300 mm long. Above this is a thermometer port. At a tee from the port a final jacketed condenser (inner 15mm, outer 22mm) 530mm long descends parallel to the column and discharges into a jar. | |||
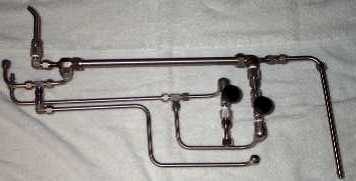
|
The water-flow system is a little different from most. Cooling
water flows into the base of the final condenser's jacket and leaves
from the top. Two cocks are placed in parallel; one adjusts the
supply to the reflux condenser; the second allows water to bypass the
condenser. Water leaves the reflux condenser's top and falls from a
spout into a tundish. Waste water is collected into a single tube
where it leaves the system. a) reflux condenser (cool water enters at base) b) collecting condenser c) reflux bypass cock d) reflux supply cock e) thermometer port f) water leaving system In use, total reflux is easily maintained at a steady boil (c closed, d opened) for, say half an hour; then c is partially opened and the fractions are taken off. I didn't have the spout and tundish at first, and found that air-locks occurred to the top of the reflux condenser towards the end of operations when the water was warm. When I put in the spout and tundish (which makes the whole thing look quaintly Victorian) the working was made much more stable, with no air-locks forming, and equilibration of the whole cooling system at atmospheric pressure. The tundish allows a visual inspection of reflux cooling water flow rates. Although the two cocks seem crude, they only apportion the flow of water at atmospheric pressure and so do not need to be precision-made. | ||||

| Update.
I thought I would send you a picture of my new offset still-head, which replaced my old two-condenser pattern. This new one is much better; it gives far more control over reflux. The column is, as before, just over a metre of 54mm diameter copper, filled with stainless steel scrubbers. A 30L stainless drum is heated by gas.
Now I've done a few distillations I'm getting my eye in. I try to do the whole process keeping under 80 degrees at the still-head. Towards the end I turn up the reflux ratio by turning up the gas and cutting the collection. With a wide column this works really well. I give up when the returns diminish, which they do rather suddenly; it's a bit like a switch being flicked (the fractionating process must be quite efficient.) The whole process gets done in 2hrs 30mins from cold (25L.) | |||
|
I've been racking my brains for an easy way to clean out the column; water doesn't do it very well. Upward travelling steam is ineffective, as the fusels in the column condense and fall back into the boiler and contaminate the water. Now I pass the steam downwards through the thermometer port after loosely capping the top of the condenser with a small weight (for safety.) This seems highly effective - the fusels come out quickly and the whole column smells sweet and fresh after ten minutes.
My wife and I enjoy the spirit obtained from a sugar/grape juice/orange wine. Quite a lot of flavour seems to come off in the distillate, so (after throwing away the first 50mL) I only bother to polish the first and last quarters of the product (after dilution), and mix these with the unpolished middle. 'Polishing' is one slow pass through about 10cm of activated charcoal. This spirit makes a nice vodka and a good base for gin. | ||||
| Victors Aircooled Still | ||||
|
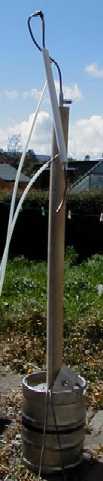
I've been tinkering with the home brewing and distillation thing for
some wee time and are up to the Mk3 iteration of my distillation
equipment. Mk1 was a simple pot still. Mk2 was a short (approx 500mm column) reflux still. Mk3 is the one refered to here. Only the boiling vessel has survived the three iterations. I've not used any calculations whatsoever, but relied on a chemical engineer (Who has built a 60 plate equivalent, 75mm diameter x 6m long reflux column,7kW steam heated fractionating still using calculations.) mate for rule of thumb guidance. The result I've acheived (I believe) is outstanding. | |||
|
Going through it for you from the floor up, the components are,... 1. 2kW electric heater. 2. 15 litre boiling vessel. 3. 50mm diameter by 1.5m long refluxing column, packed with stainless steel wool. 4. Refuxing controller. 5. Air cooled cooling tower, including thermometer. Assembly of all these components takes 5 minutes. Bringing 13 litres of wash up to refux temperature takes much longer, 2 hours, a rate limited by the size of the 2kW heater. I can bring this time down by preheating just the pot on the stoves 3.5kW hotplate and then assembling the reflux apparatus. The pot is a domestic 15 litre pot. I seal the lid with a rubber gasket and steel band. The gasket I made from (some type of) rubber round, cut to length with a splice joint and glued with contact adhesive. Against all expectations, its lasted and lasted and shows no signs of failing. The steel band that pulls the lid and pot together is from a 20 litre paint tin. Simply remove the bands existing over centre lever closure assembly, adjust its length to fit your pot, bronze on a nut to each end, drill one of these nuts, and fit a suitable set screw (ie. A fully threaded cap screw.) to tighten the band, and seal the pot. The reflux tower attaches to the lid of the pot. Because of the towers length, three issues present themselves. 1. The pot is only 0.8mm thick, so I folded a 1.2mm rib to rivet to the lid to improve the rigidity. 2. I always rope the column up to the ceiling. I don't want the thing toppling over. 3. Jointing the [pot lid/column/refux controller/cooling tower] sections together. Something simple to fabricate, assemble, vapour tight was required. Re: Jointing the [pot lid/column/refux controller/cooling tower] sections together. The solution was for the tubes to slip together by flaring one of the tubes, courtesy of an automotive muffler joint. These joints are made vapour tight by wrapping a paper gasket onto the male end of the joint during assembly. At the pot end, the tube is attached to the lid by a flange silver soldered to the end of the tube. I've run it a few times and its brilliant. Max delivery rate is 1800ml/hr and I throttle this down to 600ml/hr using a needle valve on the refuxing controller. This achieves a refux rate of 3:1. I still distill twice, the first time without the column to strip the wash from 12% to 40% to reduce the volume. Removing the column for this stripping operation is easy as all the tubes slip together with paper wrap gaskets (there is no pressure in the apparatus at all) (The tubes are flared on the ends, courtesy of a muffler joint that flared the ends of the tubes for me). The reflux controller I made, and its a simple cup inside the column that collects the distillate from the cooling tower. The cup is 50mm high to give some head to stabilize the flow rate from the needle valve. The refux portion simply overflows the cup to percolate down the column. The cooling tower is a work of art. I built this from an air conditioner evaprator. The evaprator was a core fabricated as 20 x 8mm ID Cu tubes supported in a finned aluminium layer heat exchanger. This exchanger measured 125x100mm square by 300mm long; perfect! I folded up the outer metal case to: 1) support two 240V fans; 2) protect the finning; 3) close the refux controller end of the heat exchanger; 4) support a thermometer port. One end of the cooling tower is open to the atmosphere, and the other end is closed by a me fabricated collection funnel which slips into the top of the refuxing controller. This fabricated collection funnel includes a port to hold the thermometer. I intend to rework the reflux controller as the needle valve I made on my lathe is far too coarse. Typically, the refux ratio changes from zero through to 3:1 in 1/10 of a turn. It is real touchy. I've got some pneumatic control needle valves and these should be much better. I also intend to rework the amount of head over the valve from the existing 50mm to 125mm. As it is the the performance is brilliant as I said before. My chemical engineer advisor suggests that the column as it is dimmensioned is close to optimal, and that increasing the heat input during refluxing would cause the column to flood. The physics of the column (I think?) is that with the packing density of the stainless steel wool that I have corresponds to a plate distance of 75mm to 100mm. So for the 1500mm long column that I have, this corresponds to somewhere between 20 to 15 plates, say 15 plates. Adding the liquid/vapour interface at the wash surface in the boiling pot, gives 16 plates. With this number of plates the alcohol from the reflux controller is 96% and almost tasteless. My understanding, about number of plates and refluxing,... The number of plates and reflux ratio are interdependant. As a first order approximation, an increasing number of plates corresponds to maximising the % alcohol acheived, and an increasing reflux ratio corresponds to maximising the purity of the alcohol yield. Up till now my technique is, and I intend to refine this as,...
| ||||
| Smithers Still at http://go.to/distil | |
| Smithers says ..
Packing type : stainless pot scrubbers Distillate flowrate : approx 600-700ml/hr @ 95% purity Pot capacity : 30 ltr urn approx construction cost in aussie dollars .. temp controller cost about $60 to make still head materials (stainless) cost about $15 element (1.38kw) cost $40 one carton of beer to the welder $20 dig temp probe $18 urn $20 at an auction The controller will switch 3.0kw so theoretically you wouldn't need to use the 1.38kw element but I like a speedy heat up |
Construction details/tips :
| |
| Jan Willem at http://www.geocities.com/homedistilling/ | |
| Column is 115cm long and 42 mm diameter packed with stainless steel scrubbers
Output is about 500 mL/hour at 94% purity See Jan's site for heaps of details re construction and design options. |
| The coil (for reflux) is made of 10mm soft copper, easy to wind but really inefficient to use. The coil has 12 windings and needs massive amounts of cooling water to keep the top cool enough for sufficient reflux. A innerside coil is much better, even pass trough pipes AT THE TOP! are better, but i don't like these because I want my column to be clean and empty on the inside. That means NO pipes coils or other things in the column, now I can experiment with lengths and so, it also makes it multi functional. U can turn it with a short EMPTY column into a potstill etc I'm experimenting with a new cooling thing a (sort of) drawing is atached to this message. I hope you get the idea.... |
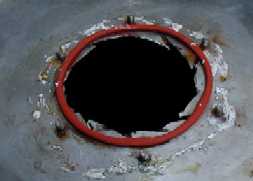
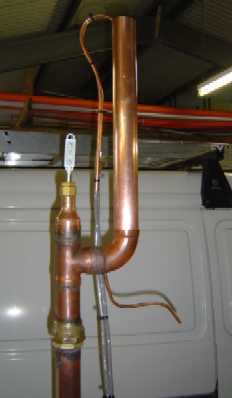
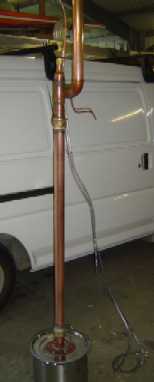
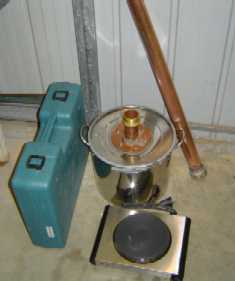
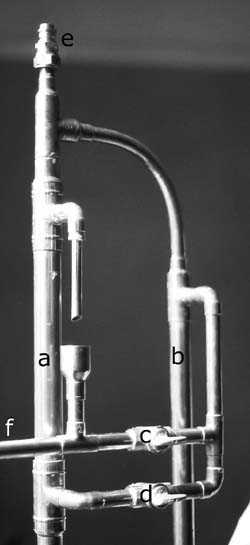
| Peter's stills | ||||
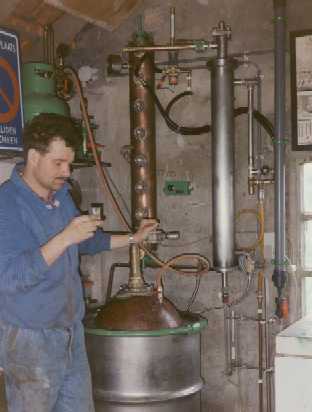
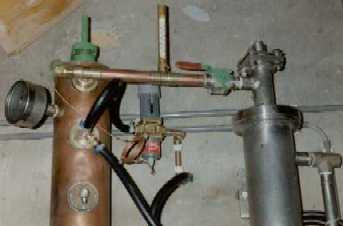
|
Reflux column:
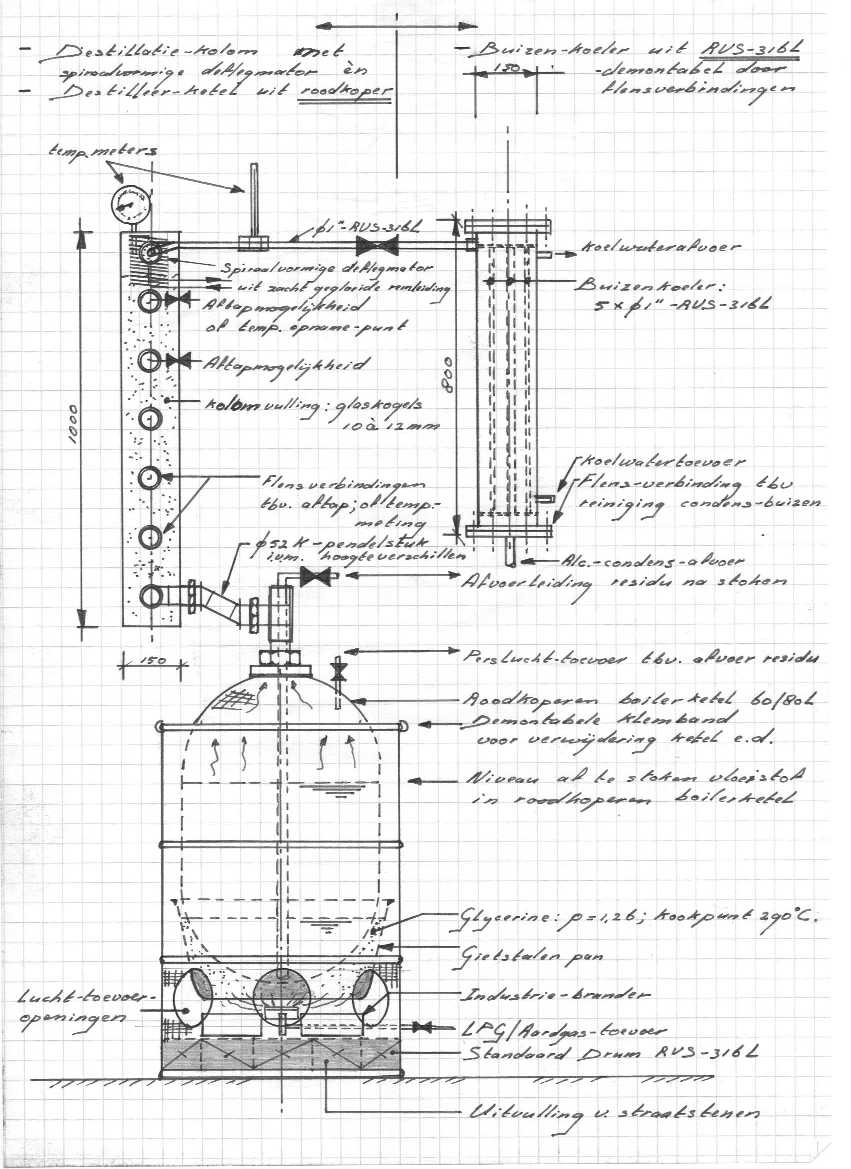
It is not very easy (to clean). But I can remove a portholes by 4 screws. I don't remove them very often. After a destilation I "clean" the Raschig Rings by steaming them for 15 min by turning off the reflux cooler. I don't know if thats very effective. Maybe a hot water flow upstreams would be a better solution. This method is also used for cleaning sand filters in traditional drinking water purification systems. I found the column in a copper rubish container, paying about NZD 4,50 per kilo. The portholes were already there. I don't know the original function of the "column". It is easily possible to turn the column, so may be it is used to mix something ? The connection between the pot an the base of the column is angled because the heavy column is fastened to the wall and the stainless steel drum stands on the ground. The "double angel tube" makes it possible to get always a good connection between the pot and the column. If there is a difference in level, than there is no problem. The tube into the bottom of the pot is used to syphon out the spent wash. I advise to use not a too small diameter for that tube. Than some particals in the wash won't be a problem to get through. The tub of glycerine that it sits in - is that open at the top, or does it seal off against the pot ? Now it is still open because the cooking-pot is made of cast iron. I am making a beter version now by using an other half copper boiler instead of the cooking-pot. It wil be soldered with an expansion tube. Than it is possible to use water instead of the glycerine too. By using a pressure relief valve the boiling-point of the water will decrease. This system is mostly used nowadays by all the german stills. By the way: you can buy these profesional home stills in germany for about NZD 10.000,--. That is a lot of money, quite a lot of farmers in germany and austria have them for stilling apples. | |||
|
Column with Plates: Each "block" = 5mm. So the diameter of the column is about 100mm. Each level has 3 standard caps of 35mm diameter intern. The cap height intern is 26 mm. I find out myself that that the LEVEL of the overflow pipe (one next to 3 caps) is very important. An engineer of Jacob Carl in Stuttgart (making profesional still equipment) adviced me to make the level of these overflow pipes variable. The U-tube on the bottom stage is necesary to force the alcohol vapour to go up only through the "gas" pipes under the caps. In the U-tube is always alcohol liquid, so that no vapour can go up here; only liquid getting down. 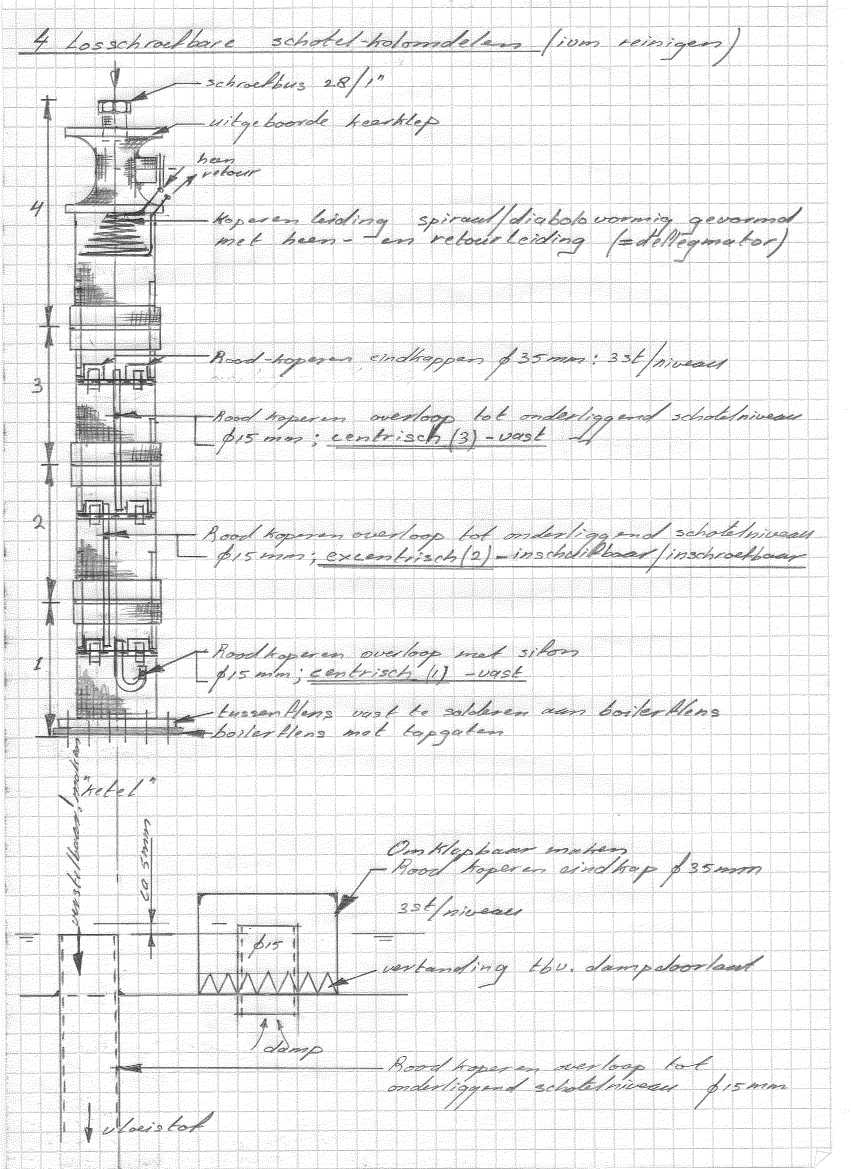
| |||
|
Alambic: (for aromatic distillates) The cooling coil in the drum has 10 cycles of about 0.26m makes: 8,2 m. I got plenty of 12 mm copper pipe and it is good to have some extra for the safety. It is fixed in a 50 L wine cask. | |||
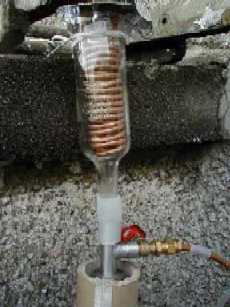
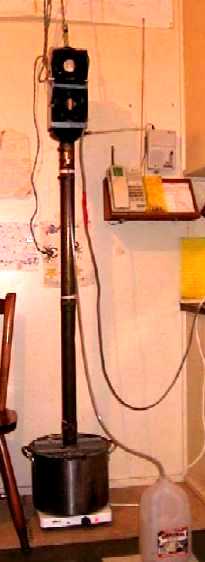
| Homer's still (Hillbillyman50@hotmail.com) | ||||

|
Diameter : 3.5 inches Reflux Column Height : 16 inches Reflux Column Packing : stainless steel pot cleaners Heat input : High on my electric stovetop Purity : 92% to 93% depending on how much reflux Flowrate : 92% at 350 ml hour and 93% at 250 ml hour (give or take little bit) Still : 4 Gallons I have five cooling coils 3/4 of the way up the column. The approximate cost was $175.00 To $200.00 The Stainless Steel valves, tubing, pipe & fittings were very expensive but it was well worth the cost for an easy to clean still. The gasket between the lid and the pot is Tygon tubing it is heat and chemical resistant. You can't see it on the photos because it was not on the pot when the photos were taken. It is very easy to clean the column. Diagram of how to make & fit the coils inside the column 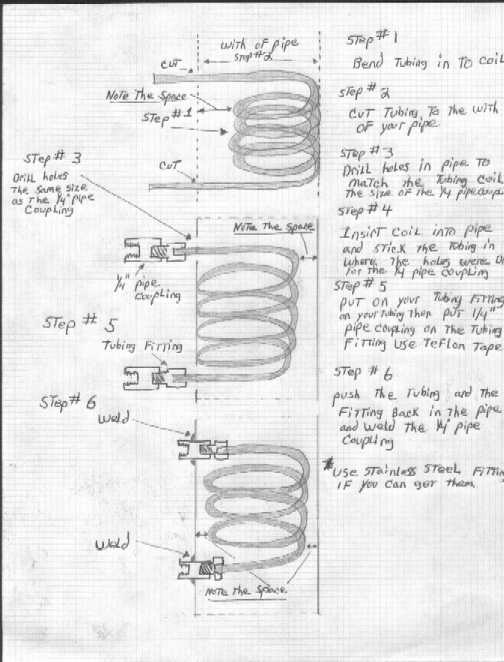
| |||
I just finished my first run through my new all stainless steel
reflux still. The spirits was a very very clean 95+%. The boiler is a
10 gallon tank and the reflux column is 2" ID and 48" tall with
stainless steel pot scrubbers. I have two 2000W elements for fast
heat up. When the wash is up to temperature I can cut off one of the
element and can regulate the wattage on the second element to
maintain the correct temperature in the reflux column. This is my
second still and they work well.
| | |||
| HuckMubb's | |
| HuckMubb comments :
|
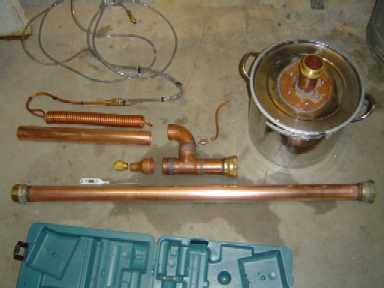
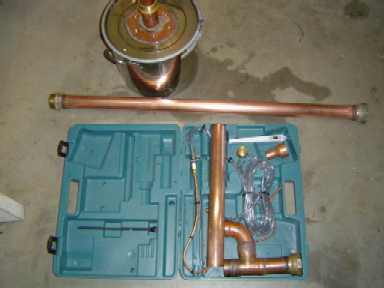
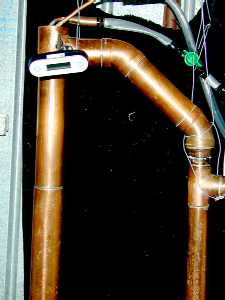
| Phil's Still (email : cobra3972000@yahoo.com ) | ||||
| ||||
|
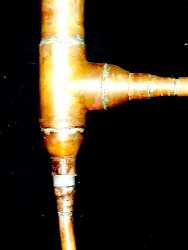
5 L boiler 1.4 m fractioning column packed with SS scrubers utilizing the cage system as shown with scrubbers installed. This allows the easy removal from column. then headspace of @ 250 mm with reflux cooling coil with water flowing down the coil then exiting via vertical center pipe. This allows a progressive cooling up the column rather than introduce cold water 250mm down and have to heat it out of order. The fractioning column splits apart. I have the column of 1.4m odd of 50mm ID pipe rising from the boiler, this contains the SS Scrubers, then the top section just slids over this using a length of 54mm ID pipe has 50mm ID soldered to it at the top. Where the 50mm meet inside the 54mm i have carefully lapped the two together to ensure a near gas proof joint with neither solder or thread required. Then to make it fully gas tight the outside slip joint has teflon tape wound around the 50mm pipe at the point the 54 slides to. This has proved simply and functional. The cooling coil is blocked of at the top by a plate forcing all vapor to pass over the coil at some point The digital temp gauge as you can see is inserted to measure the vapor temp as it rolls over to head towards the condensor. The condensor is a shotgun type with 12 6mm pipes inside a 38mm jacket. It is 635mm long internal cooling length @ 8m cooling length and a HUGE surface area After a couple of small cleaning runs and a test with some plum wine a real run was done. 95% was achieved without any problem. Flow to the reflux coil can be adjusted independent of the shotgun condensor. A few more runs has yeiled the following.. I run total reflux for @ 30-40 minutes or until the vapor temp stabilises about 40C. I then slowly back off the reflux water and raise the vapor temp till i get 77c reading on the DT (digital temp) (it reads 1.4 low) over about 10 minutes. I take WHATEVER the reflux ratio is and smile and patiently collect the end product in 250-300ml batches. (empty and sterilised barcadi breezer bottles) Late in the run i will increase reflux once only to hold the temp reading stable. Once the vapor temp rise 1C I stop collecting the main cut. collect some tails till 85C then stop. Total water usage is less than 20 litres/hour and with some better valves for water control this should drop to about 12 l/hour. This is due to the reflux condensor not even getting warm past the top T piece. Just can't get fine enough control at this time. Urn has three heat setting high (2000W) med and low. Use high to heat up wash and Med to keep a rolling boil | ||||
| Ted's Still at http://mwci.s5.com/ | ||||
| This still is built from materials from the local hardware store.
All of the plumbing is standard copper plumbing pieces. The kettle is a 5 gallon
canning kettle. The top is held on with spring clips, and flour paste provides
a good seal. The still can be disassembled easily for cleaning. The column
is a 1 inch copper pipe filled with copper pot scrubbers. Above this is a
short reflux condenser. The only tools needed to build this were a propane
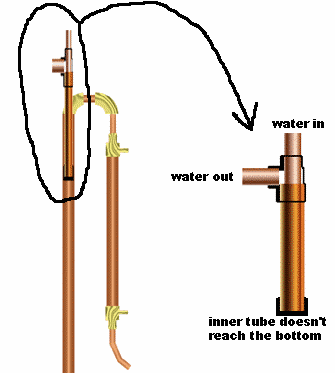
torch, pipe cutter, screw driver, and dremel tool with a grinding bit. From an 8% wash, I get 94+% at 600ml/hour. It will run like that until the alcohol is nearly gone from the wash and then the flow drops off and the temperature starts to rise. At this point I kill the reflux and collect tails to 96 C. Here you can see the reflux condenser jacket which is made out of a 1" T. There is a small plastic tube inside the one that you can see, that goes over to a point in the main condenser. So, even though it looks like the there is only one port for cooling water there is actually a flow through it. | |||
| Robert Warren's "Charles 803" at http://running_on_alcohol.tripod.com email robertwarren@mail.com | |
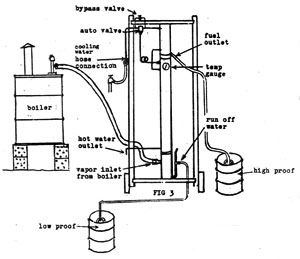
| This is a fuel alcohol still, designed to be a higher volume still, allowing you to run 50 to 100 gallons of mash at a time and make enought ETOH to fill your gas tank. |
| Marks's Still | ||||
| Purity : 95 % | |||
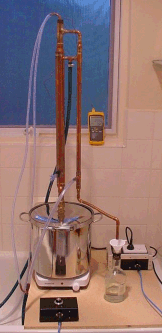
| The Ultra Pure Still at www.puredistilling.com | |
|
Purity: 95% 100% Money Back Guarantee Using just a 25cm column, this still produces 2 bottles of spirits from its 5L boiler in just 30 minutes, including heatup time! It uses a 2200W element, and amphora structured copper mesh for smooth, authentic flavour. Comes with a digital thermometer for accurate cuts. A true reflux still for an excellent price - just $467 delivered anywhere in the world - guaranteed. |
| http://homedistiller.org This page last modified |